Dave's Hopper
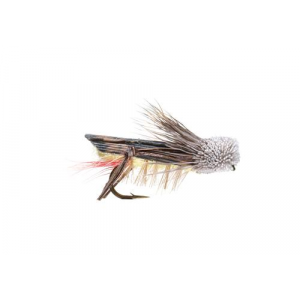
Hook:
dry fly 2X sizes 4 - 12
Thread:
gray
Tail:
Red deer hair with a loop of yellow yarn
Body:
yellow wool yarn
Hackle:
brown palmered over body and clipped
Underwing:
yellow calftail
Wing:
mottled turkey lacquered
Legs:
Pheasant tail feather fibers clipped and knotted
Collar:
matural light deer hair spun
Head:
natural light deer hair spun and clipped
How to tie a Dave's Hopper Fly
Step
1
Start your thread about a third of the shank back from the eye and lay a thread base to the bend of the hook.
Step
2
Stack a small bunch of red deer hair for the tail. Measure the tips about a third of the length of the hook shank and tie it in at the hook bend. The butt section of the deer hair will flare out, but that's OK for now.
Step
3
Grab the butt ends of the deer hair, pull it out of the way, and advance your thread to about three quarters the way up the hook shank.
Step
4
Pull the butt ends of the deer hair forward, and secure them in place with a few thread wraps to create the base of the underbody, and trim the butts. Bring your thread back to where you tied in the tail using just a few spiral wraps around the deer hair.
Step
5
Return the thread to the front of the deer hair, making criss crossing spiral wraps.
Step
6
Tie in a section of yellow yarn towards the bend of the hook on top of the deer hair. Depending on the thickness of your yarn, you may need to split it in half. Making spiral wraps again, bring the thread back to the bend at the same point you tied off the tail and make several wraps to secure the yarn. Do not cut the yarn at this point.
Step
7
Make a loop with the yarn by folding it on itself and making another couple wraps of thread in the exact same place. The yarn loop should be just barely shorter than the tips of the deer hair tail. We're still not trimming the yarn!
Step
8
Lay the yarn over the existing base of deer hair and yarn. Advance the thread toward the eye of the hook, making spiral wraps, to the same tie off place you used for the deer hair and to tie in the yarn itself. Now you can secure the yarn and trim it down.
Step
9
Return the thread to the tie in spot at the bend of the hook again using a few spiral wraps. Prepare a brown hackle feather by removing the webby fibers at the base. The length of the hackles don't matter since we'll trim them later. Tie in the feather toward the bend of the hook.
Step
10
Bringing the thread back to the front of the underbody, tie in another piece of yellow yarn. This one should be about half the thickness of the first. Secure it over top of the whole underbody using spiral wraps to the bend of the hook again, then bring your thread back forward to just in front of the underbody.
Step
11
Wrap the thread forward as if it is dubbing to create a smooth, level underbody. Tie it off in front of the underbody, then make a couple thread wraps at the very front of the underbody itself. This is where you'll tie off the hackle feather in the next step.
Step
12
Palmer the hackle feather forward and tie it off at the very front of the underbody where your thread is hanging. Clip the tip of the feather
Step
13
Trim the hackle fibers to be very short, like bristles. You can leave them slightly longer on the bottom of the fly, but they should remain less than half the distance of the hook gap.
Step
14
Cut a piece of a turkey tail feather from the quill, approximately the width of the hook gap. Coating it with lacquer or cement will prevent it from splitting easily, and will make the fly more durable.
Step
15
Trim the butt end of the feather into a rounded shape. Tie it in at the front of the underbody (you shouldn't have moved your thread from earlier yet) to make the wing with the rounded butt end towards the tail. The wing should extend past the tail loop, but not past the red deer hair tail fibers.
Step
16
Now we need to make the legs. You can cheat and buy premade legs, or you can make them yourself. There are a number of ways to do this, but the easiest is to tie the fibers in a knot while they're still on the feather with the stem of the feather in a vice. You'll want the length from the knot to the fiber to be about one hook shank length. Try not to trim the tips - it's best to keep the natural taper! To increase durability, coat the fibers lightly with lacquer afterwards from the knot to the fiber tips.
Step
17
Tie a leg on each side of the hook. You still haven't moved the thread, so you're tying it in at the same tie off point on the underbody. The knee knot should be at the bend of the hook. It's starting to look like a hopper, now, isn't it??
Step
18
Clean and stack a clump of deer hair. Set the hair on top of the fly with the tips extending about halfway down the wing. The butts should extend just past the eye of the hook. The natural tips will form the collar for the fly. Make a couple loose wraps of thread, but do not pull to secure.
Step
19
Hold on to the butts of the deer hair and firmly pull the thread toward you. This will create a nice flare of the deer hair on the front of the body, but will not spin the hair around the hook shank.
Step
20
Pull the butts of the deer hair back and advance the thread to just in front of the yarn body. Create a thread base up to the eye of the hook, and return your thread back to in front of the yarn.
Step
21
Clean another stack of deer hair. Cut the tips off this stack, leaving about an inch of the butts, depending on the size of your fly. This clump will get spun on the hook.
Step
22
Lay this clump with the middle of the stack at the front edge of the body. Make three loose turns again. This time, pull the thread firmly toward you, but let go of the butts of the deer hair allowing it to spin around the shank.
Step
23
Pull the butts backward, and bring the thread in front of that second bunch.
Step
24
Repeat the deer hair spinning process with one more bunch of deer hair of similar size. It should be tied in just in front of the second bunch in the same manner.
Step
25
After the third bunch of deer hair is spun, pull the butts backwards and bring the thread to the eye of the hook. Whip finish and snip the thread.
Step
26
Using a razor, shape the hair into a square shaped head. The bottom should be trimmed flat. The sides should be trimmed flat moving from front to back. Be careful not to trim off the collar! Repeat on the top, again moving from front to back, and avoiding the collar. Use scissors to trim any strays!